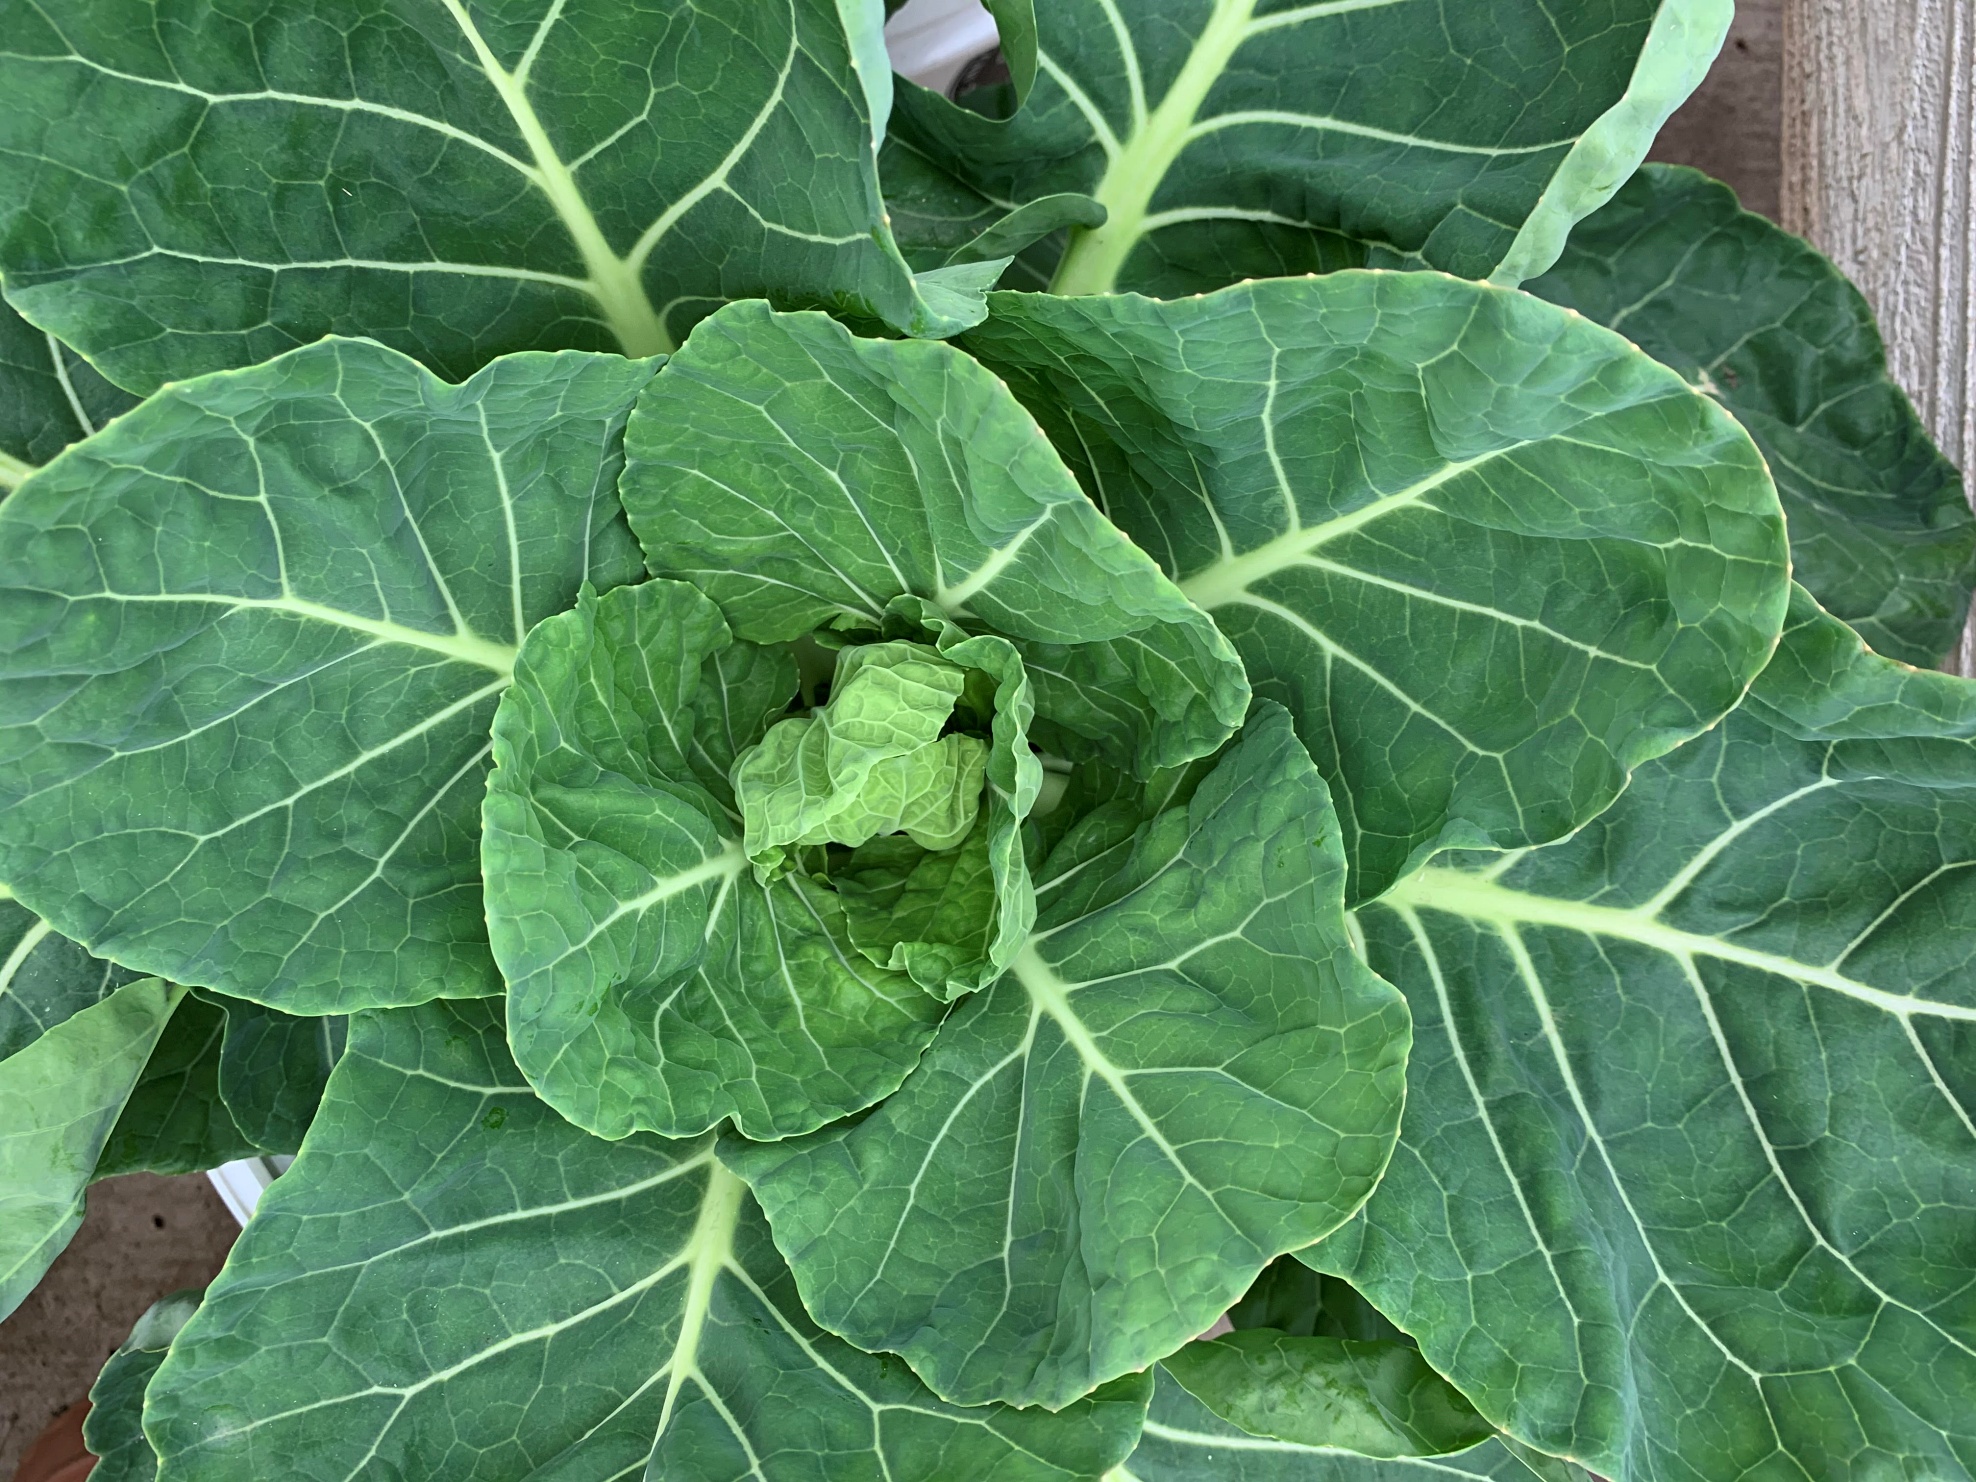
Brussels sprouts, which were named after the capital of Belgium where they were first grown in the 16th century, are members of the brassica family. Their large leaves are reminiscent of other brassicas such as broccoli, cauliflower, cabbage, and mustard greens.
These miniature cabbage look-alikes have grown in popularity in recent years. Not only does this vegetable taste amazing, but it is also good for you. Rich in vitamins C and K, Brussels sprouts also contain calcium, iron, potassium, fiber, and protein. In addition, they have an amazing compound called glycosinolate glucobrassicin, which research says may help prevent damage to your DNA and thus help protect you from getting cancer. The compound may also help stop new blood vessels from growing inside tumors.[1]
This article contains affiliate links. If you make a purchase using one of these links, I will receive a very small commission at no additional cost to you, and it will help me maintain this website. Rest assured, I only recommend products I actually like!
Brussels sprouts are a cool-weather crop, meaning they grow best in cooler temperatures, preferably between 45o F and 75o F (7o C and 24o C), and will bolt when warmer weather hits. Like carrots, Brussels sprouts will taste sweeter after they have experienced a light frost or two. They can tolerate a few days below freezing, but not for extended periods.
A row cover, cold frame, or greenhouse can help extend the season in the colder months if necessary. In warmer climates, a row cover can help protect sprouts from warming temperatures in the late spring.
How to Plant Brussels Sprouts
If you ask ten gardeners when to plant Brussels sprouts, you are likely to get ten different answers. So much depends on which zone you live in and the severity of your winters. But in general, if you desire to grow a fall-winter crop, plant seeds indoors under grow lights about three to four months before your first frost date in the fall, or direct sow about four months before the first frost date. If you are unsure of your frost dates, I have a link listed under Helpful Gardening Links on my Resource page where you can find out.
For a spring harvest, you will need to start seeds indoors under a grow light about six to eight weeks before your last frost date in the spring, or direct sow them about two weeks before the last frost date. Consult the seed packet or your county extension agent for more specific information. (The link is also found on my Resource page under Helpful Gardening Links.)
Plant seeds 1/2 inch deep and 18 to 24 inches apart. Seeds should sprout in about one week. Transplant seedlings that you have grown indoors when they are 3 to 6 inches tall. Keep in mind that young plants tend to bolt if temperatures drop below 50 o F (10 o C) for extended periods.
If you want to grow them in containers, place one Brussels sprouts plant in a container that is at least 12″ in depth and 12″ in diameter. I have grown them in five-gallon food-grade buckets with very good success!
Whether planting in beds or containers, you may want to stake the plants at some point. As they mature, they become top-heavy and the weight can cause the plant to fall over, upending its shallow roots. A simple bamboo stick and some twine will do the trick.
Soil
Brussels sprouts grow best in soil that is slightly acidic with a pH between 6.5 to 7.0. If you are not sure about the pH level of your soil, there are quick, simple, and affordable test kits available. This is the one I use. (Check out my articles on soil pH and how to how to raise or lower it.)
Try adding mature compost or other soil-building material like Dr. Earth’s prior to planting to help reinvigorate the soil. If using fresh potting mix in a container or raised bed this is not necessary.

The soil needs to be well-draining but does not need to be particularly loose as Brussels sprouts prefer the surrounding soil to be firm but not compacted. Thus, you will need to lightly pat down the soil around the plant when transplanting or as the seedlings mature if you direct sowed.
Sun and Water
Even though Brussels sprouts are a cool-weather crop, they need at least six to eight hours of full sun. They also require consistently moist, but not soggy soil. If the soil gets too dry, the sprouts will not develop properly. Check the soil regularly, especially if growing in containers, and water when the top one inch is dry to the touch. Consider using mulch to help maintain moisture levels, especially if growing in warmer climates.
Fertilizer
Brussels sprouts, like other brassicas, need a nitrogen-rich fertilizer. Generally speaking, apply fertilizer four to six weeks after planting and then again after another six weeks, or follow the package directions for the fertilizer you prefer. If you are growing in containers, you will need to fertilizer more frequently as plants have less access to nutrients because there is less soil and because nutrients can wash away over time. Blood meal is a good source of nitrogen as is fish emulsion, which works faster because it is a liquid. Again, follow package directions.
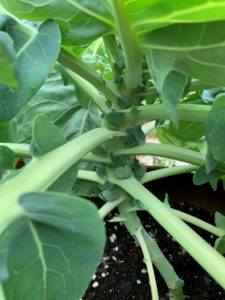
You may discover that some of the lower leaves of the plant will turn yellow. This is not uncommon. Although yellowing lower leaves can also be a sign of low nitrogen, there is no need for concern if you have you have been fertilizing them. Simply cut off the yellowing leaves. This will allow the plant to focus its energy on growing sprouts. Many gardeners also remove the lowest level of leaves as the plant matures. Since the sprouts grow in between the leaf axils, where the leaf stem meets the main stalk, this light pruning allows them more room to grow and provides the plant with better air circulation.
Topping Off and Harvesting
Brussels sprouts have a long growing season. Depending on the variety, they will mature in 80 to and 130 days after planting.
You may have heard that some gardeners top off their Brussels sprouts plants prior to harvesting. If you are unfamiliar with this term, topping off refers to the removal of the plant’s growing tip. Doing so encourages the entire stalk of sprouts to mature at once by forcing all of the plant’s energy into sprout production instead of plant growth. If you are interested in topping off you will need to do so about one month before the intended harvest date.
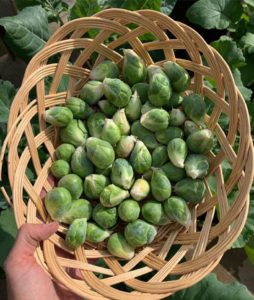
Instead of topping off, some gardeners prefer to harvest the sprouts individually when they reach about 1/2 inch to 1 inch in diameter. The sprouts will begin to mature from the ground up, so harvest from the ground up as well. If you wait too long to harvest them they will become bitter.
Remove the leaf directly below the sprout to make harvesting easier. You can cut or twist off the sprouts. Afterward, a second round of sprouts may begin to grow at the base of the stem. Although the sprouts are not as tightly formed as the first ones, they are still edible. Brussels sprouts will keep in the refrigerator for about one week. Do not wash them until you are ready to eat them.
Pests
Cabbage worms are not really worms at all but velvet green caterpillars with short fine hairs and five sets of pro-legs (pseudo legs). They measure about 1.25 inches long and are the larval stage of the white butterfly. They start by feeding on the underside of leaves but will progress to feed on new growth and bore holes into the sprouts. Dark green droppings are a telltale sign cabbage worms leave behind. To learn more about this pest and how to deal with it see How to Get Rid of Cabbage Worms
Cabbage loopers are the larval stage of the nocturnal mottled gray-brown moth. Loopers are light green caterpillars with white stripes down their backs. Depending on their developmental stage, they measure between one and two inches in length. Cabbage loopers are easy to differentiate from other caterpillars. When they crawl, they arch their bodies creating a loop, hence the name cabbage loopers. To learn more about this voracious eater and how to get rid of them, see Cabbage Loopers and How to Get Rid of Them
Flea Beetles are tiny black or bronze beetles that are known for eating a buckshot pattern of small holes in leaves. They are carriers for viral and bacterial diseases, and the larvae are known to feed on roots and germinating seeds. For more about this destructive pest, see Flea Beetles: How to Identify and Treat Organically
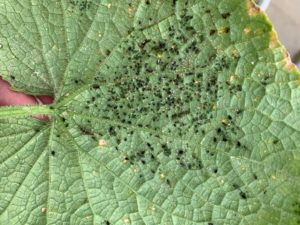
Aphids are very small, soft-bodied insects that hide on stems and the underside of leaves. They can form colonies seemingly overnight and wreak havoc by sucking the sap from a wide variety of plants. They secrete a sticky substance called honeydew, that promotes the growth of black sooty mold and attracts ants. The ants feed on the honeydew and in turn, protect the aphids from predatory insects. You can learn how to treat aphids in this article: 9 Ways to Organically Treat Aphids in Your Garden.
Cutworms are caterpillars that chew the roots and leaves of a variety of plants. They are known for cutting the plant’s stem off at the soil, hence the name cutworm. Many gardeners recommend placing a cardboard collar into the soil around the base of the plant to deter the caterpillar’s access. Neem oil is also an effective deterrent. You can make your own spray by mixing 1 to 2 teaspoons of pure, cold-pressed neem oil with the naturally occurring ingredient, Azadirachtin (this is the one I use), with 1/2 teaspoon of Castile soap and 1 quart of water. Be sure to perform a spray test on a leaf and wait 24 to 48 hours to see results before spraying the rest of the plant. Monitor the plant and apply it every seven days or so. You can learn more about cutworms in my article: How to Identify and Get Rid of Cutworms.
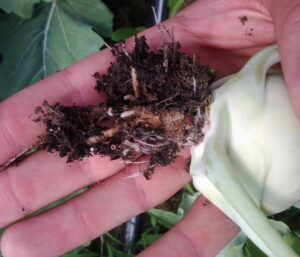
Cabbage root maggots are the larval stage of the cabbage root fly. The maggots work unseen beneath the soil eating the roots of brassicas, including Brussels sprouts. Often the only sign of their presence is wilting leaves. But by then it may be too late to save the plant. Preventative measures work best such as using a cardboard collar at the base of plants to keep the flies from laying their eggs. Row covers can also provide an effective insect barrier. You can learn more about this pest and how to eliminate it in this helpful article.
Snails and Slugs eat holes in leaves. The trail of slime they leave behind often gives them away. You can find them hiding just under the soil’s surface or on the sides and bottom of containers. Set an inexpensive trap by laying a board or a piece of cardboard on top of the soil. In the morning, you will find them hiding under the trap where you can collect and dispose of them easily.
Diseases
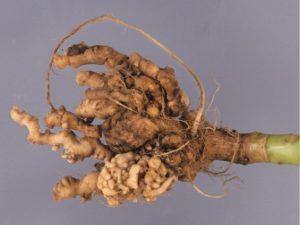
Clubroot – Brussels sprouts, along with other brassicas, are prone to clubroot, which is a fungal disease that causes large clubs or galls to develop on the roots. The galls stunt the plant’s growth because the swollen roots are unable to absorb water and nutrients. Symptoms above the soil will include yellow and or wilted leaves.
If you suspect you have an infected plant, pull it and check the roots. If you discover it has severe galls, throw it away. Do not compost it since most compost piles do not get hot enough to kill the fungi.
Prevention is the best defense against clubroot. To avoid clubroot, maintain a soil pH of 7.0 as the fungus thrives in acidic soil. Also, be sure to practice crop rotation since clubroot fungus can live in the soil for many years.
Hollow Stems can develop when there is too much growth over a short period of time. This is often caused by too much nitrogen in the soil but it can also be the result of high temperatures. High nitrogen can also cause the sprouts to be loose. To remedy, grow Brussels sprouts in the right temperatures and follow fertilizer package instructions.
Hollows stems and small buds can also be a sign of boron deficiency. If this is the case, Bonnie recommends adding boron to the soil by dissolving 1 level tablespoon of borax in 5 quarts of water and sprinkling it evenly over 50 square feet of bed.[2] Adjust the dose accordingly for smaller areas. Do not add boron unless these symptoms occur. Do not add more because too much boron can cause problems!
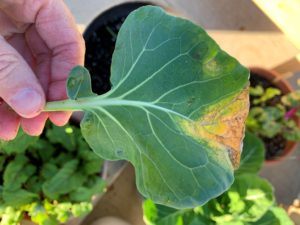
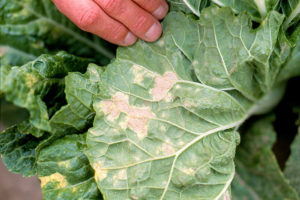
Downy Mildew is a pseudo fungus that first appears on the underside of leaves as a gray to bluish-white powder or fuzz. It is then followed by yellow spots that develop on the upper side. Downy mildew is sometimes confused with powdery mildew.
The best organic treatment for downy mildew is cold-pressed neem oil with Azadirachtin. It will not cure it, but it can control it if caught early. If the infection is severe, remove the infected plants and throw them away. Do not compost them.
Damp leaves and poor air circulation create a hospitable environment for downy mildew. Therefore, do not overcrowd Brussels sprouts when planting so there is adequate airflow between the plants, and try not to get the leaves wet when watering.
Rust is a fungal disease that causes rust-colored spots or bumps to develop on plant leaves. To avoid this problem, avoid getting leaves wet when watering and allow for adequate circulation. Also, plant disease-resistant varieties (see below).
Ring Spot is another fungal disease that can infect Brussels sprouts. It is identified by small, purple spots that are surrounded by a ring of water-soaked leaf tissue. As the disease progresses, the spots will turn brown. Leaves may dry out, curl in, and eventually drop off.
Ring spot thrives in humid, cool conditions. Life other fungal diseases, you will need to allow for good air circulation, avoid getting the leaves wet and practice crop rotation. Destroy any plants that are infected.
Varieties
There are many varieties of Brussels sprouts to choose from. Some of the popular ones include:
Bubbles is a variety that does well in warmer, drier climates and is more tolerant of heat. It is resistant to powdery mildew and rust. It has large, 2 inch sprouts that are ready to harvest in about 85 to 90 days.
Catskill is a compact variety with a moderate to high yield. It requires 90 to 110 days to mature.
Diablo is a variety that is known as a heavy producer. It is also disease resistant and ready to harvest in about 110 days.
Jade Cross is a compact variety with a high yield and is reported as being resistant to some diseases. It is more heat tolerant and takes about 90 days to mature.
Long Island Improved, which is often confused with Catskill, may be the most common, high yield variety. It is supposed to tolerate freezing temperatures better than other varieties but does not do as well in warmer weather. This variety matures in about 90 to 100 days.
Flagstaff is a unique variety with red-purple stalks and stems and dark green leaves. The sprouts are red-purple as well.
Brussels sprouts are such a rewarding crop to grow and well worth the wait. If you have never grown this amazing vegetable, or if it has been a while, consider adding it to your fall-winter or early spring lineup!
Thank you for reading this article! If you found it helpful, please consider sharing it with others via email or social media!
[1] https://www.webmd.com/food-recipes/health-benefits-brussels-sprouts
[2] https://bonnieplants.com/how-to-grow/growing-brussels-sprouts/
Excellent information! Thank you for sharing!
Thank you so much for reading and for taking the time to comment! Happy Gardening!